Mabroor Essentials Nusuk Hajj help · not the official site

Nusuk Hajj · verification trouble

Rejected? Here’s how to fix it.

A verification rejection is not a Hajj rejection. It means one thing in the application needs fixing: usually the personal photo, the passport image, or the way a name was typed. Fix it, resubmit, and the application goes back to Under Verification.

Open the section you need. Not sure which? Start with the first one: it shows how to read the reason and which section to open. Already know your message? Jump to the . If nothing works, the fourth part explains .

Quick steps to checkAdmin loginClick the bell iconRead the reason of rejectionClick your name (top right)My Family: see which member was rejected

Detailed steps

You may get a rejection email, but the reason itself sits behind the bell in the top bar. The email goes to the admin for every member of the group: if your own status says verified and you still received one, a family member was rejected. The notice never says whose; these four steps get you the reason and the person, then point you to the fix.

  1. Find the bell icon

    After the code, Nusuk opens your Dashboard (“Welcome Back!”, your name, and the ten-step journey bar). For a rejected application the bar is stopped at step 4, Application Verification. The reason is not written on this page.

    The bell is the last icon in the top bar, after your name and the cart. A dot on it means a notice is waiting. On a phone the bell sits in the top bar beside the menu button.
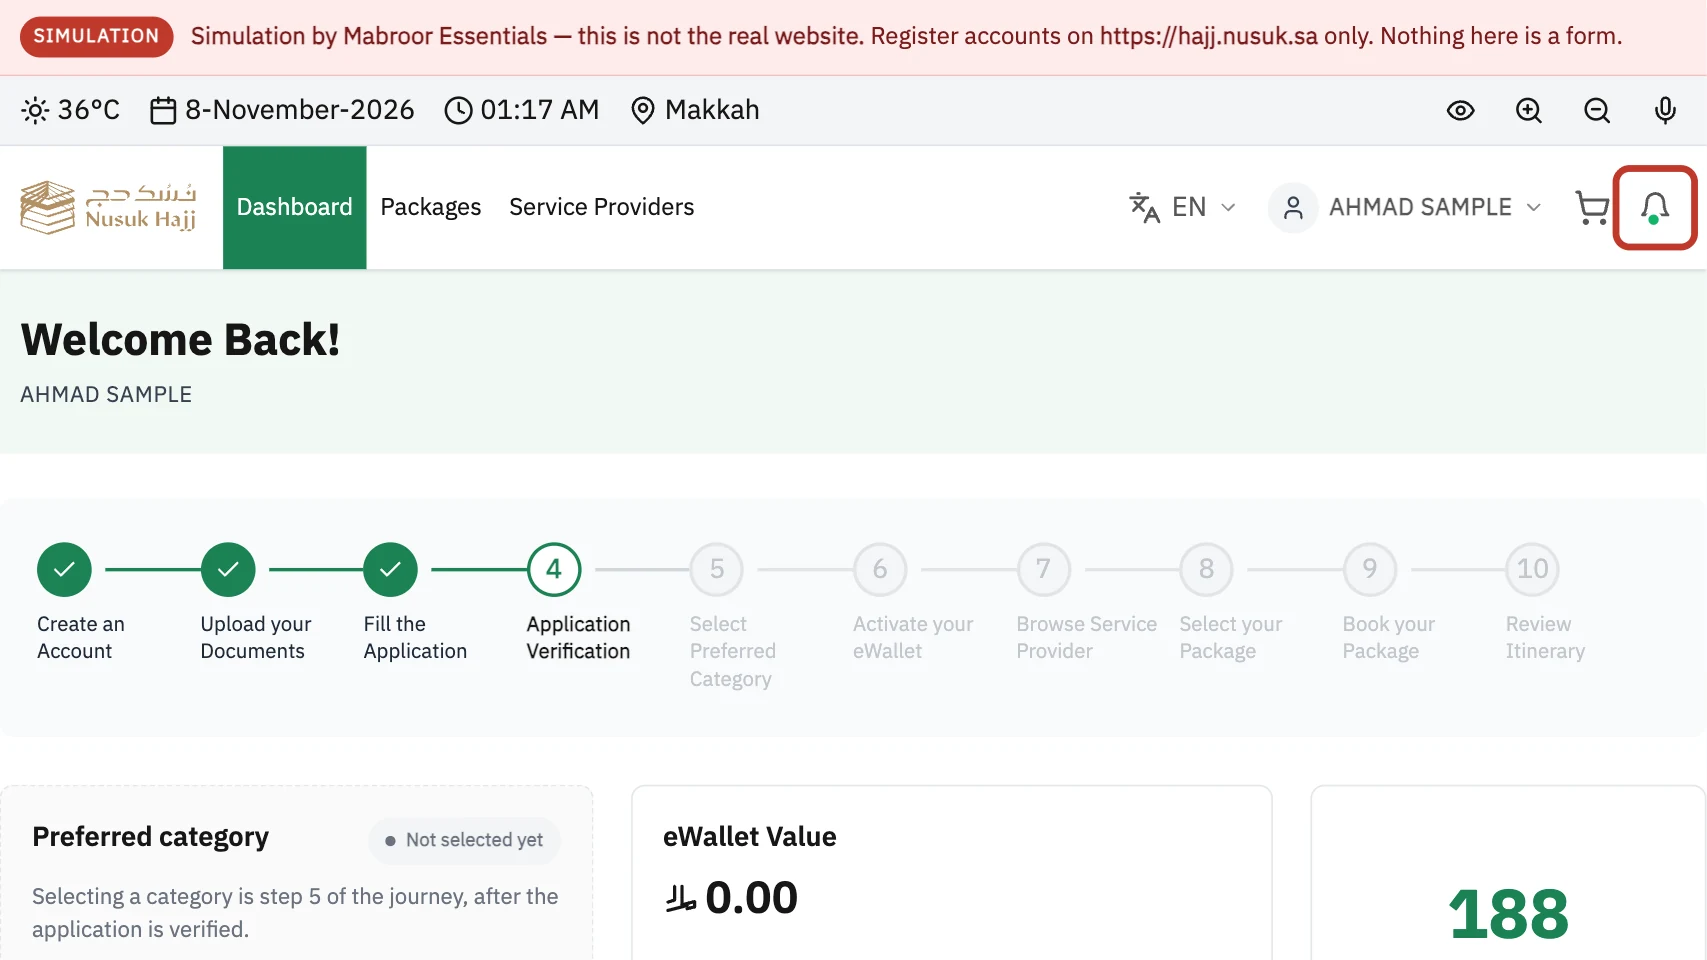
    The dashboard right after login. The bell is at the right end of the top bar.
    Screenshot comingThe dashboard after login, bell at the top right
    The dashboard right after login. The bell is at the right end of the top bar.
  2. Open the notifications

    Click the bell. A Notifications panel slides in from the right with every notice Nusuk has sent, newest first. Read the newest one.

    If a message is cut short, click View all notifications at the bottom of the panel: the Notifications page shows each message in full.
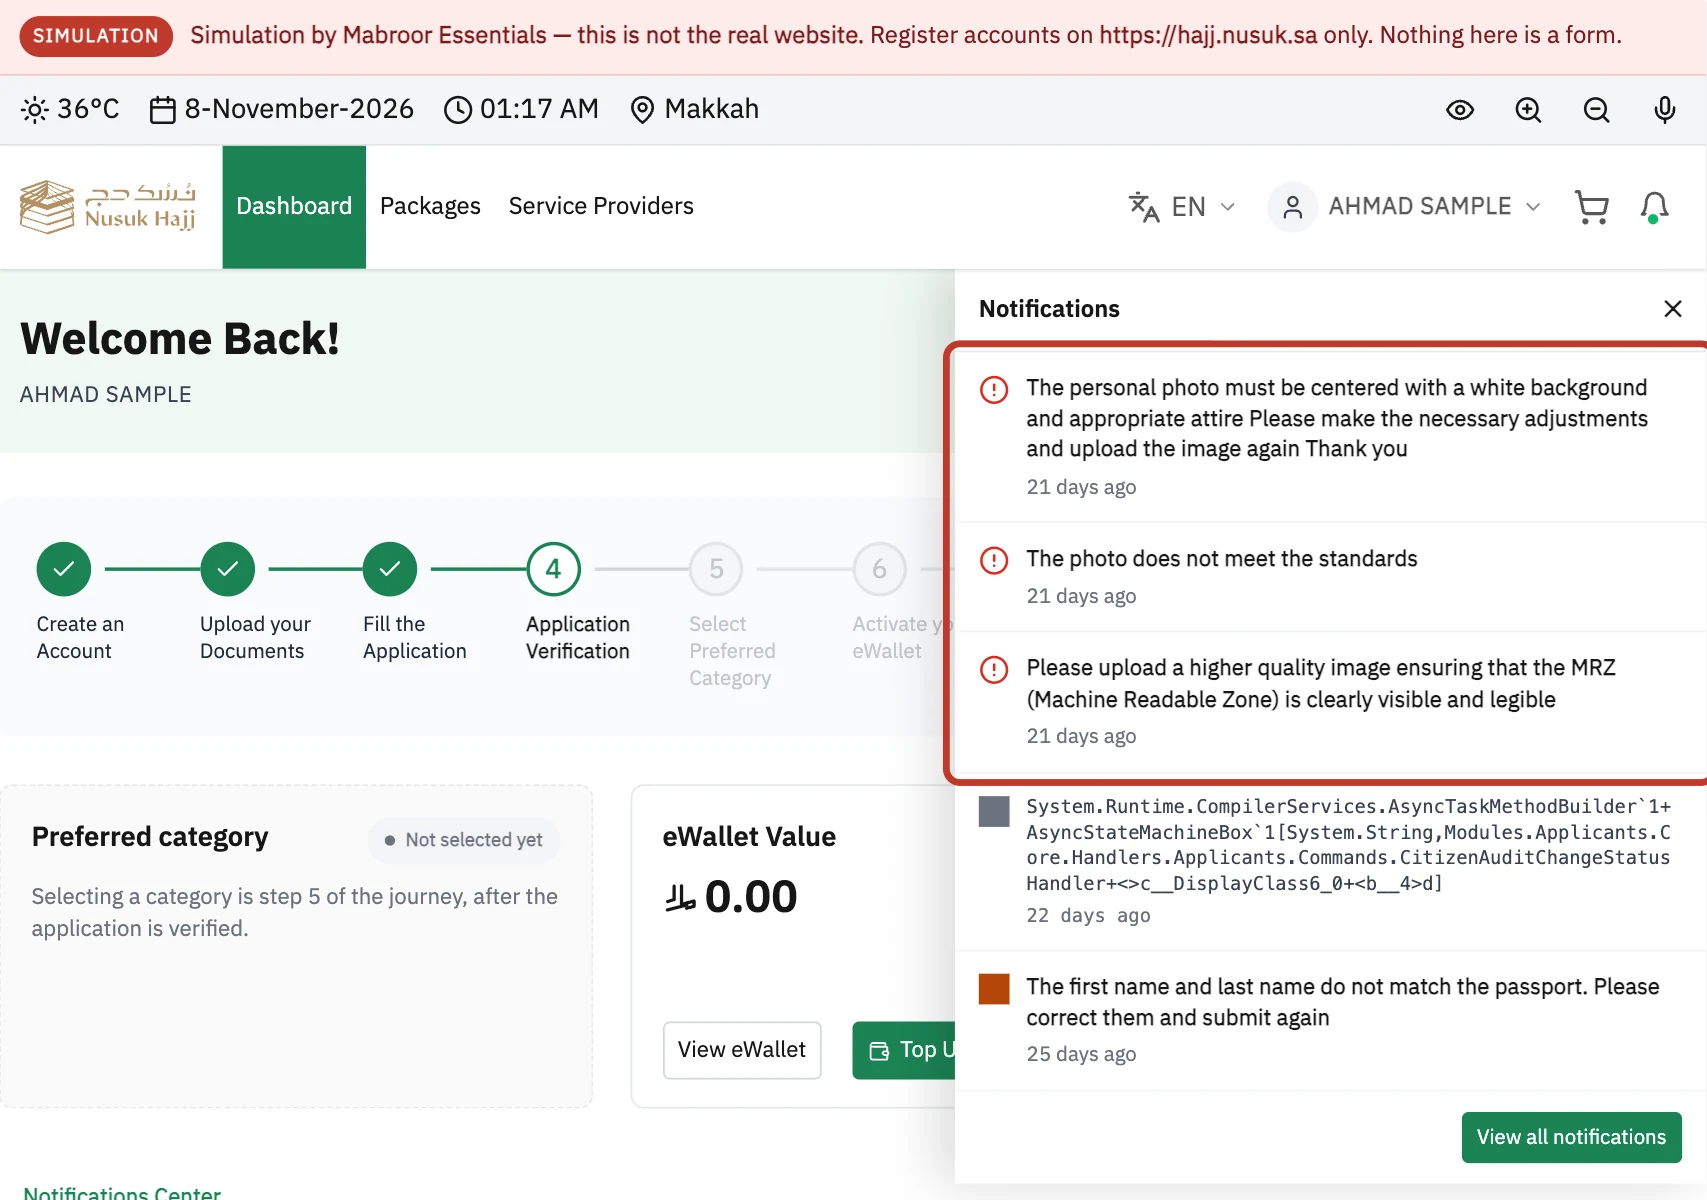
    The Notifications panel. The newest notice is the one that matters.
    Screenshot comingThe Notifications panel open, newest notice at the top
    The Notifications panel. The newest notice is the one that matters.
  3. Find out whose application it is

    Click your name at the top right and choose My Family. Every member of the family group is listed with a status badge: green Application verified, or red Application rejected with a red Click here for more button beside it. That person is the one to fix.

    If every member is verified and only your own row (the admin’s, marked “Me”) says rejected, the fix is on your own profile: your name → My Profile. The rejection email always comes to the admin, even when a member was rejected, so a verified admin can still receive one.

    If opening a member shows “Member does not have system user”, that member never finished creating their own login. Ask Mabroor Essentials before going further.
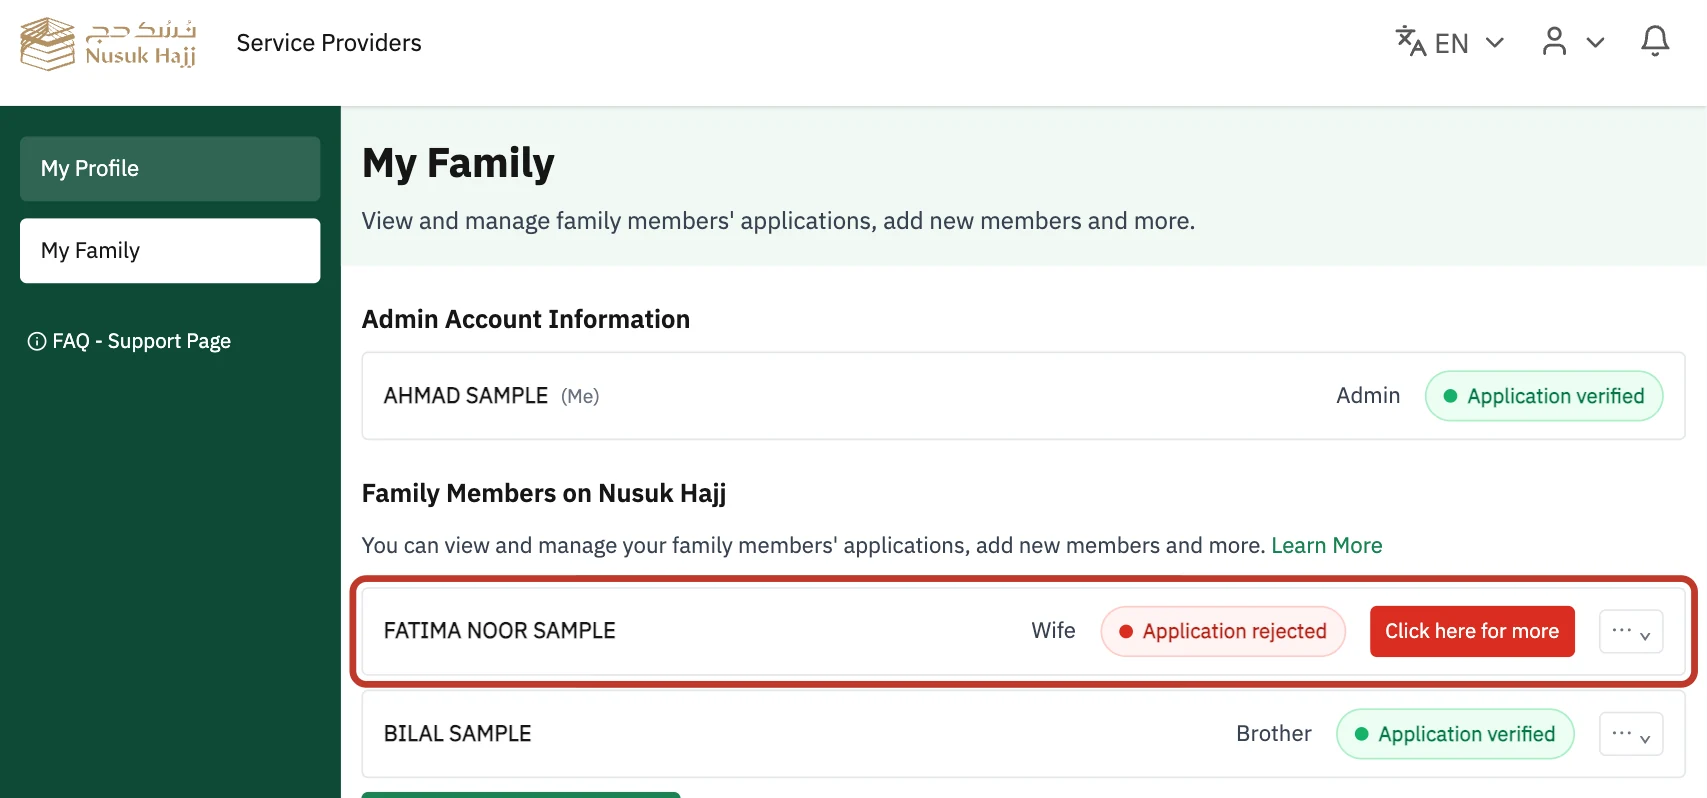
    My Family. The red badge and the red button mark the application to fix.
    Screenshot comingMy Family with a red “Application rejected” badge and “Click here for more”
    My Family. The red badge and the red button mark the application to fix.
  4. Common reasons for rejections

    These are the notices Nusuk sends. Find yours and tap it: it takes you to the fix.

    • The personal photo must be centered with a white background and appropriate attire. Please make the necessary adjustments and upload the image again. Thank youThe personal photo was rejected.
    • The photo does not meet the standardsSame meaning, shorter wording: the personal photo.
    • Please upload a higher quality image ensuring that the MRZ (Machine Readable Zone) is clearly visible and legibleThe passport scan: the two machine-readable lines at the bottom of the page could not be read. Re-scan the page with a scanning app and replace it.
    • The passport must be valid for at least 6 months after the arrival to the KingdomThe passport expires too soon. For this season it must be valid through November 27, 2027. Renew it, then scan and upload the new passport.
    • System.Runtime.CompilerServices.AsyncTaskMethodBuilder`1+AsyncStateMachineBox`1[System.String,Modules.Applicants.Core.Handlers…A wall of computer text is a Nusuk display bug. In practice an image was rejected: the personal photo, or the passport scan when its two machine-readable lines cannot be read. Check both.
    • The first name and last name do not match the passport…Wording varies. Anything about the first name, last name or a mismatch means the typed names do not match what the passport prints, or the passport scan was too unclear to compare.
    • Anything else, or nothing makes senseA notice you cannot place, or a second rejection after a fix.
Now open the section that matches:

Quick steps to editAdmin loginMy Profile / My FamilyEdit Personal InformationDelete pictureUpload new one using the guide below

Most image rejections come from framing, background or glare. Get the picture right with the guides below, let hajjphoto.com handle the size and the white background, then replace the file on Nusuk (open at the end of this section).

The photo guides

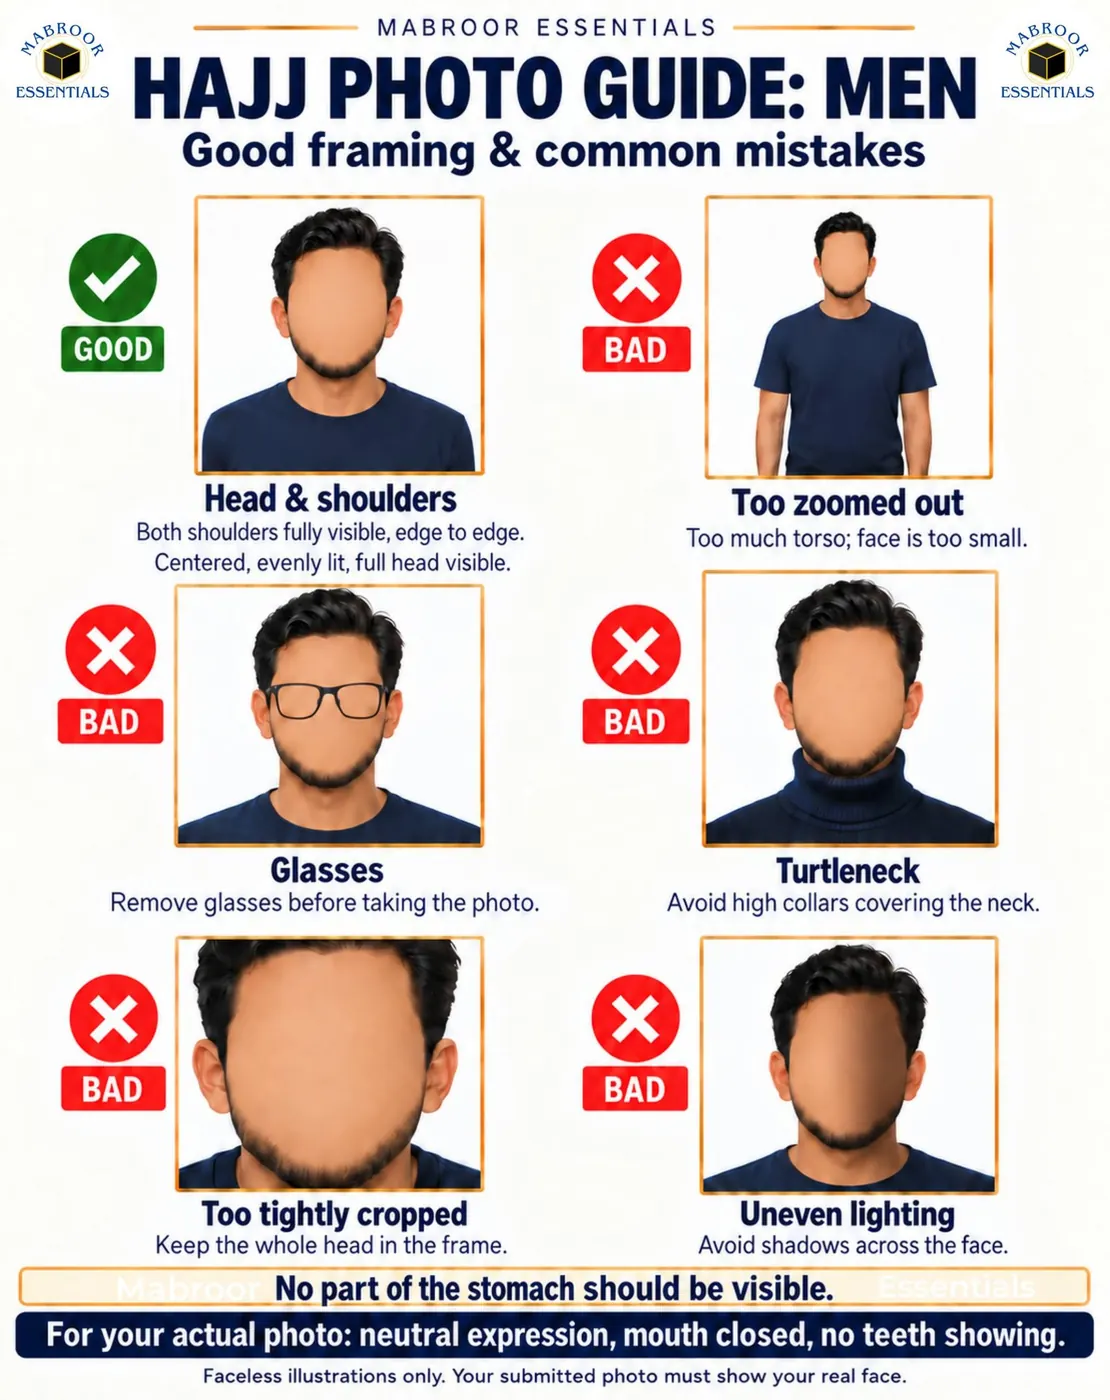
Hajj photo guide for men: good framing and the common mistakes
Personal photo · men · full size ↗
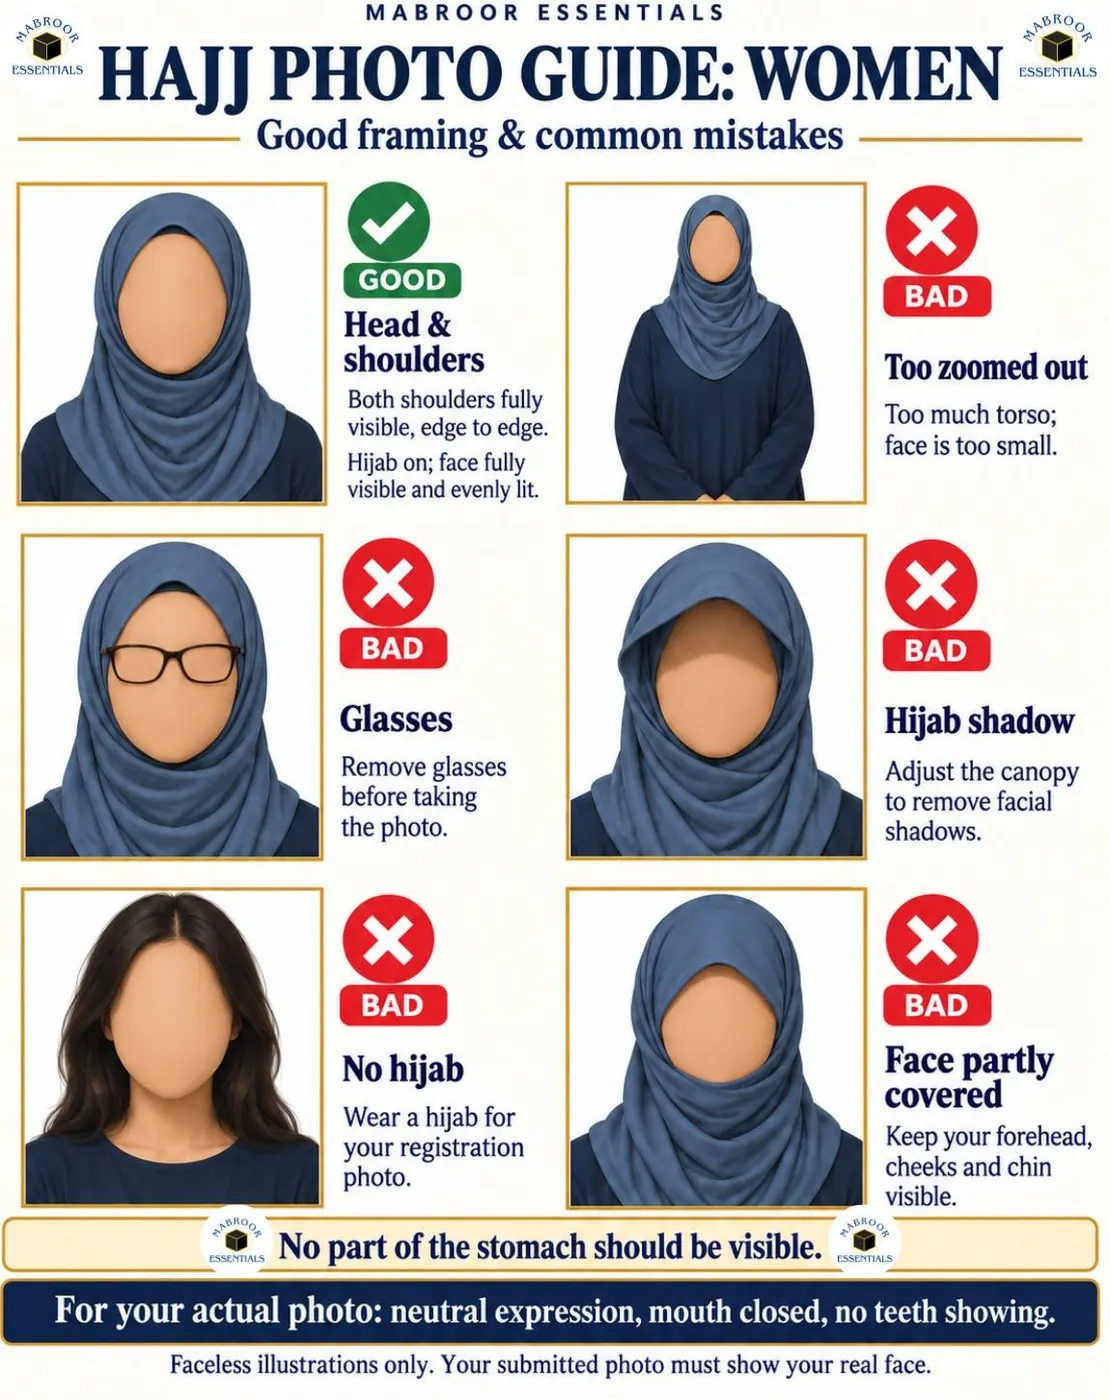
Hajj photo guide for women: good framing and the common mistakes
Personal photo · women · full size ↗
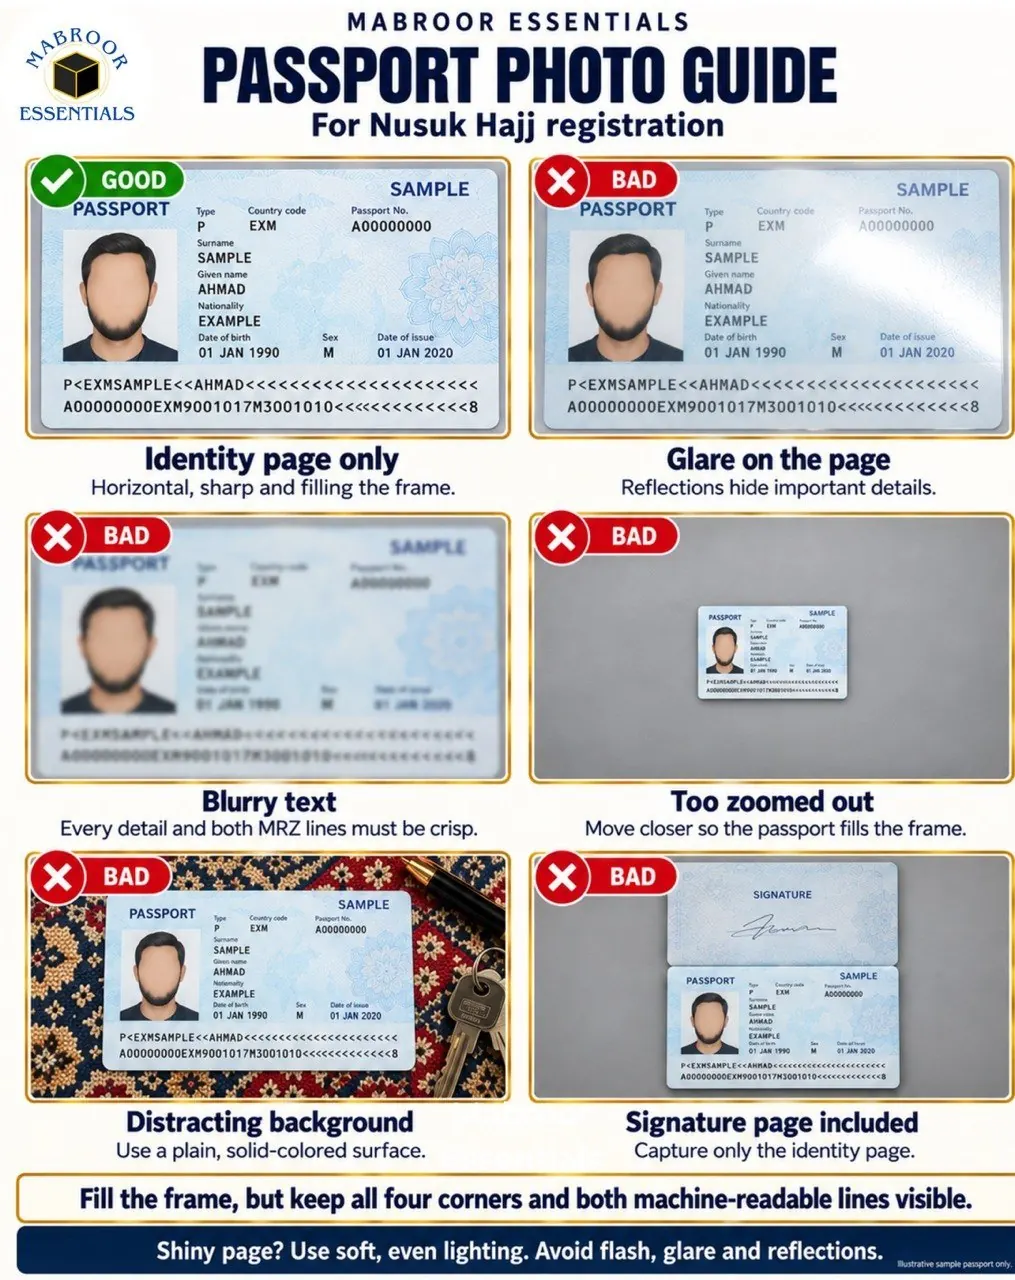
Passport page guide: flat, all corners visible, the machine-readable lines sharp
Passport page · full size ↗

Personal photo: what passes

  • Head and shoulders, centred, both shoulders visible edge to edge.
  • Plain white background, even light, no shadows. Stand a little away from a plain light wall.
  • Formal or modest attire, face fully visible from forehead to chin, neutral expression, mouth closed.
  • No glasses, hat, filter or group photo. Have someone else hold the phone at chest height; a selfie distorts the face. A hijab is fine, with no shadow on the face.

Passport page: use a scanning app

Do not photograph the passport with the plain camera. Download a scanning app on your phone and scan the identity page with it: it flattens the page, trims the edges and removes glare.

The app is CamScanner; both badges open the same app.

  • Scan the identity page only, with all four corners in and nothing cut off.
  • Soft, even light, flash off: no glare, no blur.
  • The two machine-readable lines at the bottom (the rows of letters and < signs) must be sharp enough to read. “MRZ not readable” and the garbled “System.Runtime…” notice mean exactly this.
  • Save the scan as a JPG or PNG (not a PDF).
  • After scanning, pass the passport photo through hajjphoto.com (choose the Passport slot). It comes back at the size Nusuk accepts; then upload it on Nusuk.

While the passport is in your hand: it must be valid through November 27, 2027 for this season. If it expires before then, start the renewal now.

Size it on hajjphoto.com

  1. Open hajjphoto.com on the phone that holds the picture.
  2. Choose the slot: Personal Photo or Passport.
  3. Upload the picture (for the passport, the scan from the scanning app). It comes back at the exact size Nusuk wants (480 × 640 for the photo, with a white background), under 1 MB. Do not resize anything yourself.
  4. Save it, then upload it on Nusuk in place of the rejected file (see ).

Nusuk’s limits

Nusuk slotFormatDimensionsMax size
Personal PhotoPNG / JPGexactly 480 × 640 px (width × height)1 MB
Attached PassportPNG / JPGwidth 400–1200 px, height 400–2000 px1 MB

Limits confirmed by Mabroor Essentials on 1 November 2026; Nusuk changes them without notice.

  1. Open the person’s application

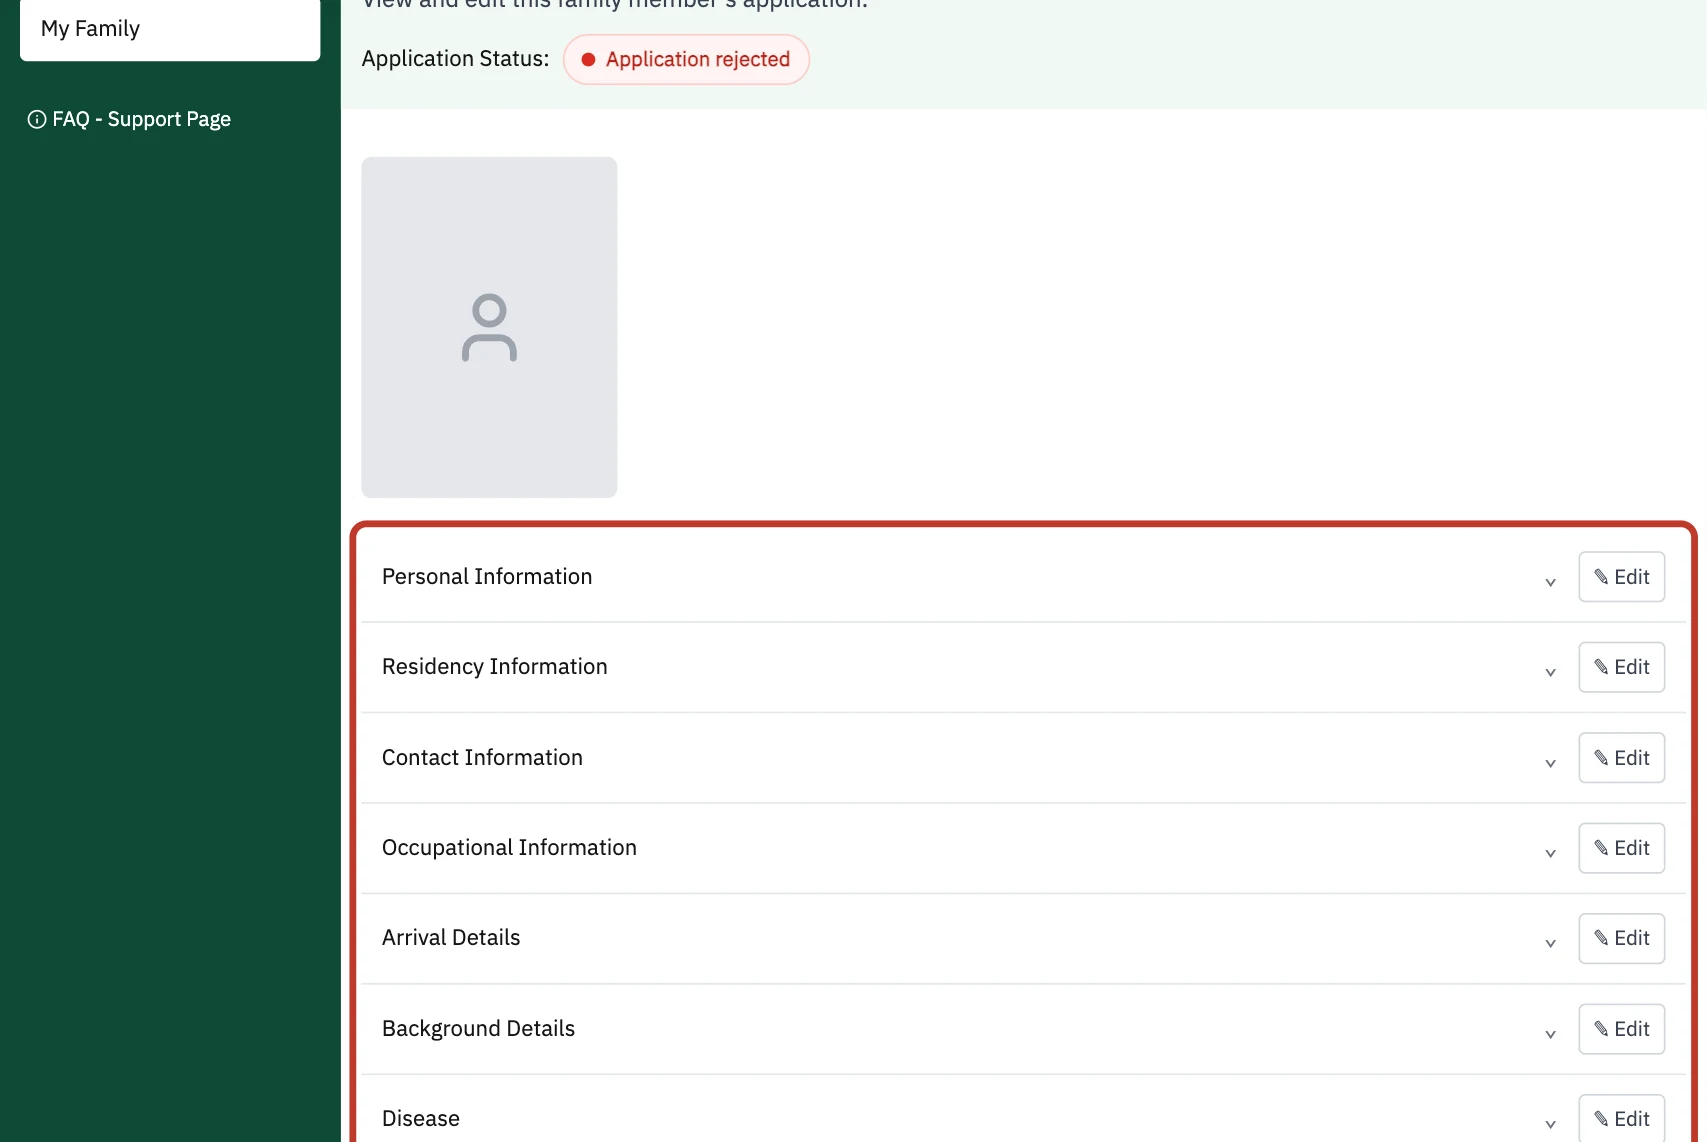
    Click your name at the top right → My Family → the red Click here for more beside the rejected member. For your own application: your name → My Profile.

    The application opens as a list of sections, each with an arrow and an Edit button. Only the admin sees Edit.

    The application. Edit appears only when you are logged in as the admin.
    Screenshot comingThe application sections, each with an Edit button
    The application. Edit appears only when you are logged in as the admin.
  2. Click Edit next to Personal Information

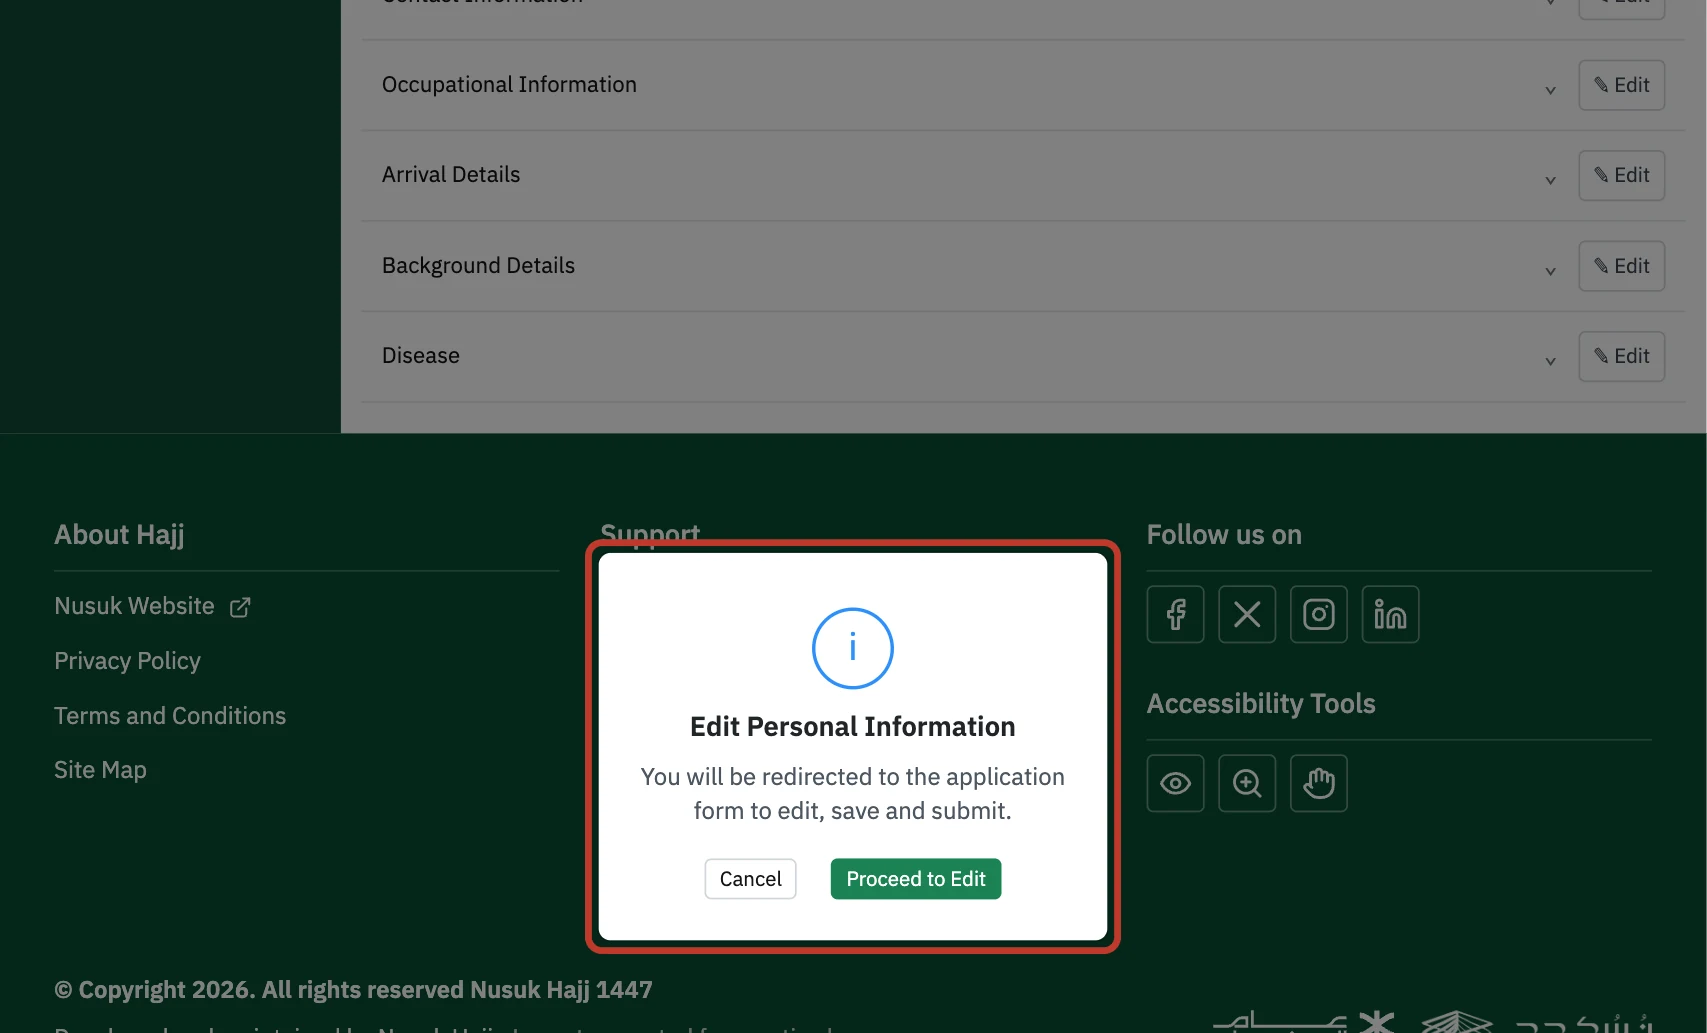
    A pop-up explains that you will be redirected to the application form to edit, save and submit. Click Proceed to Edit.

    The confirmation before the form opens.
    Screenshot comingThe “Proceed to Edit” pop-up
    The confirmation before the form opens.
  3. Scroll to “2. Uploaded Documents”

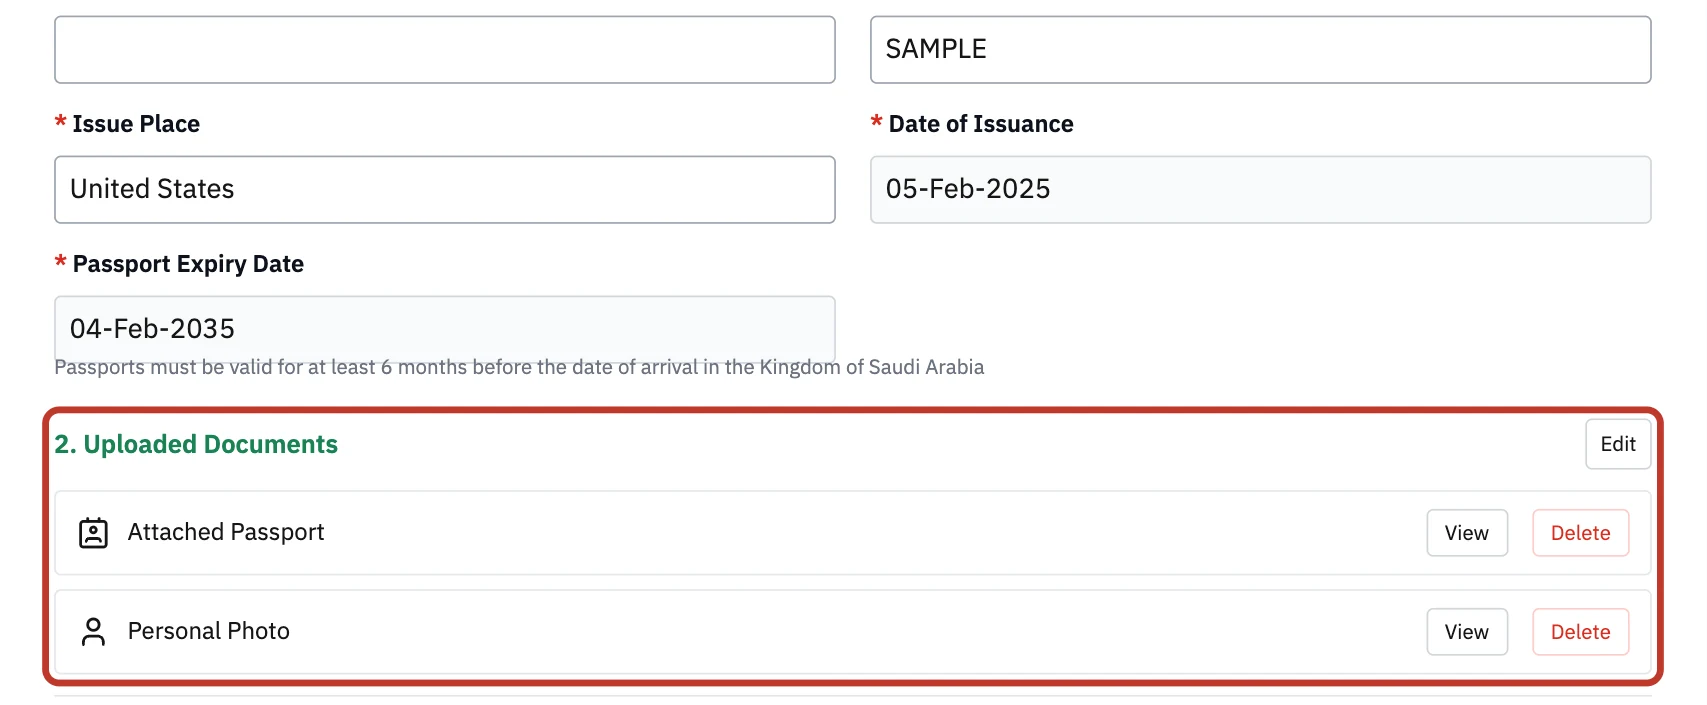
    Below the passport fields you will see Attached Passport and Personal Photo, each with View and Delete. No extra Edit click is needed here: Delete works straight away.

    The two uploaded images, each with View and Delete.
    Screenshot coming“2. Uploaded Documents” with Attached Passport and Personal Photo
    The two uploaded images, each with View and Delete.
  4. Delete the rejected file, upload the new one

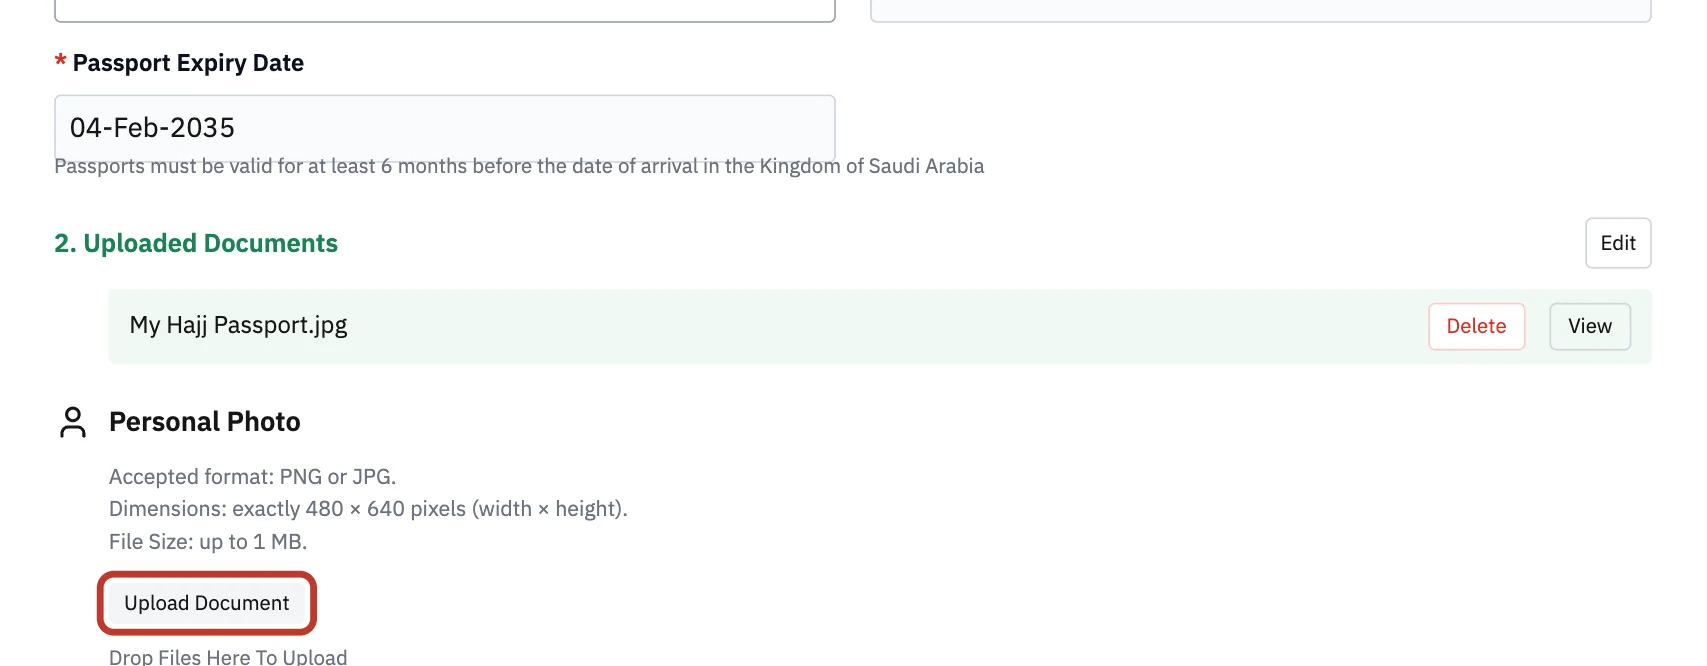
    Click Delete on Personal Photo (or on Attached Passport for the passport). The slot turns into an Upload Document button. Choose the new file from hajjphoto.com; its name appears in the slot.

    A red “File(s) failed to upload” means the file broke a limit. Re-make it on hajjphoto.com, choosing the matching slot.

    After Delete the slot becomes an Upload Document button.
    Screenshot comingThe Upload Document button after Delete
    After Delete the slot becomes an Upload Document button.
  5. Save & Submit

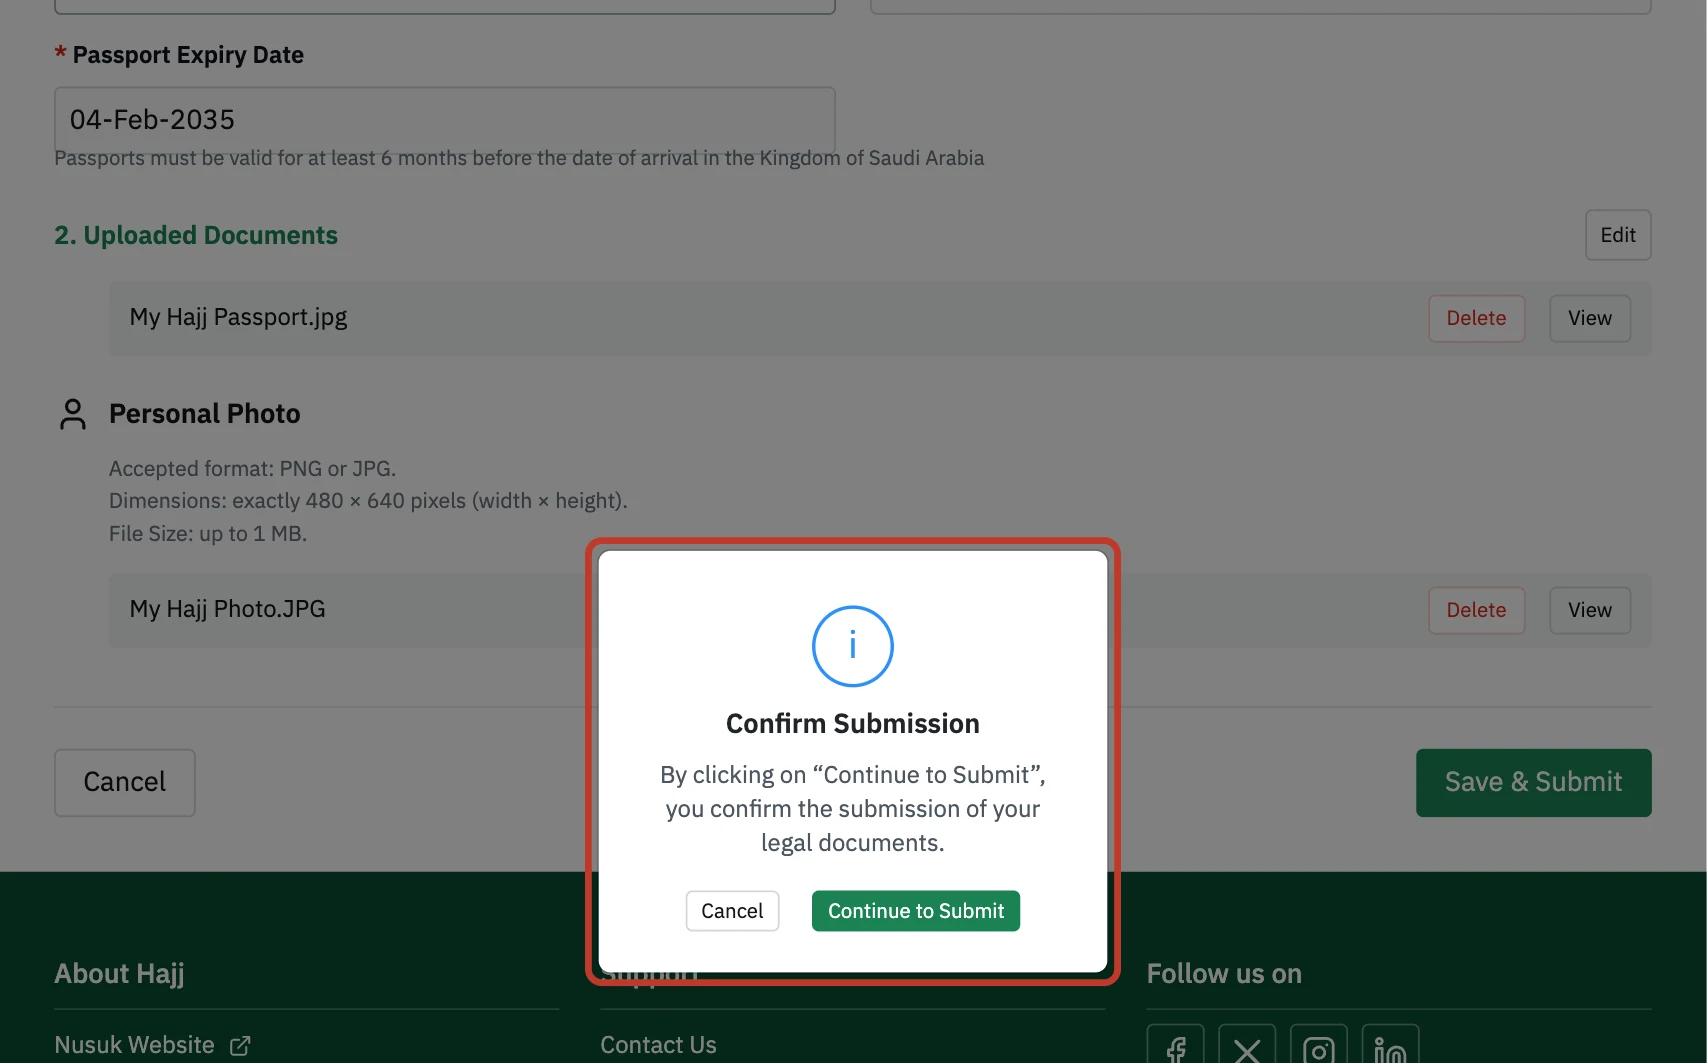
    Click Save & Submit at the bottom of the form, then Continue to Submit in the pop-up. The status changes from Application rejected to Under Verification. Check My Family (or My Profile) a day later to confirm it changed.

    Save & Submit, then Continue to Submit.
    Screenshot comingSave & Submit and the Confirm Submission pop-up
    Save & Submit, then Continue to Submit.

Quick steps to editAdmin loginMy Profile / My FamilyEdit Personal InformationChange the names (two ways below)Save & Submit

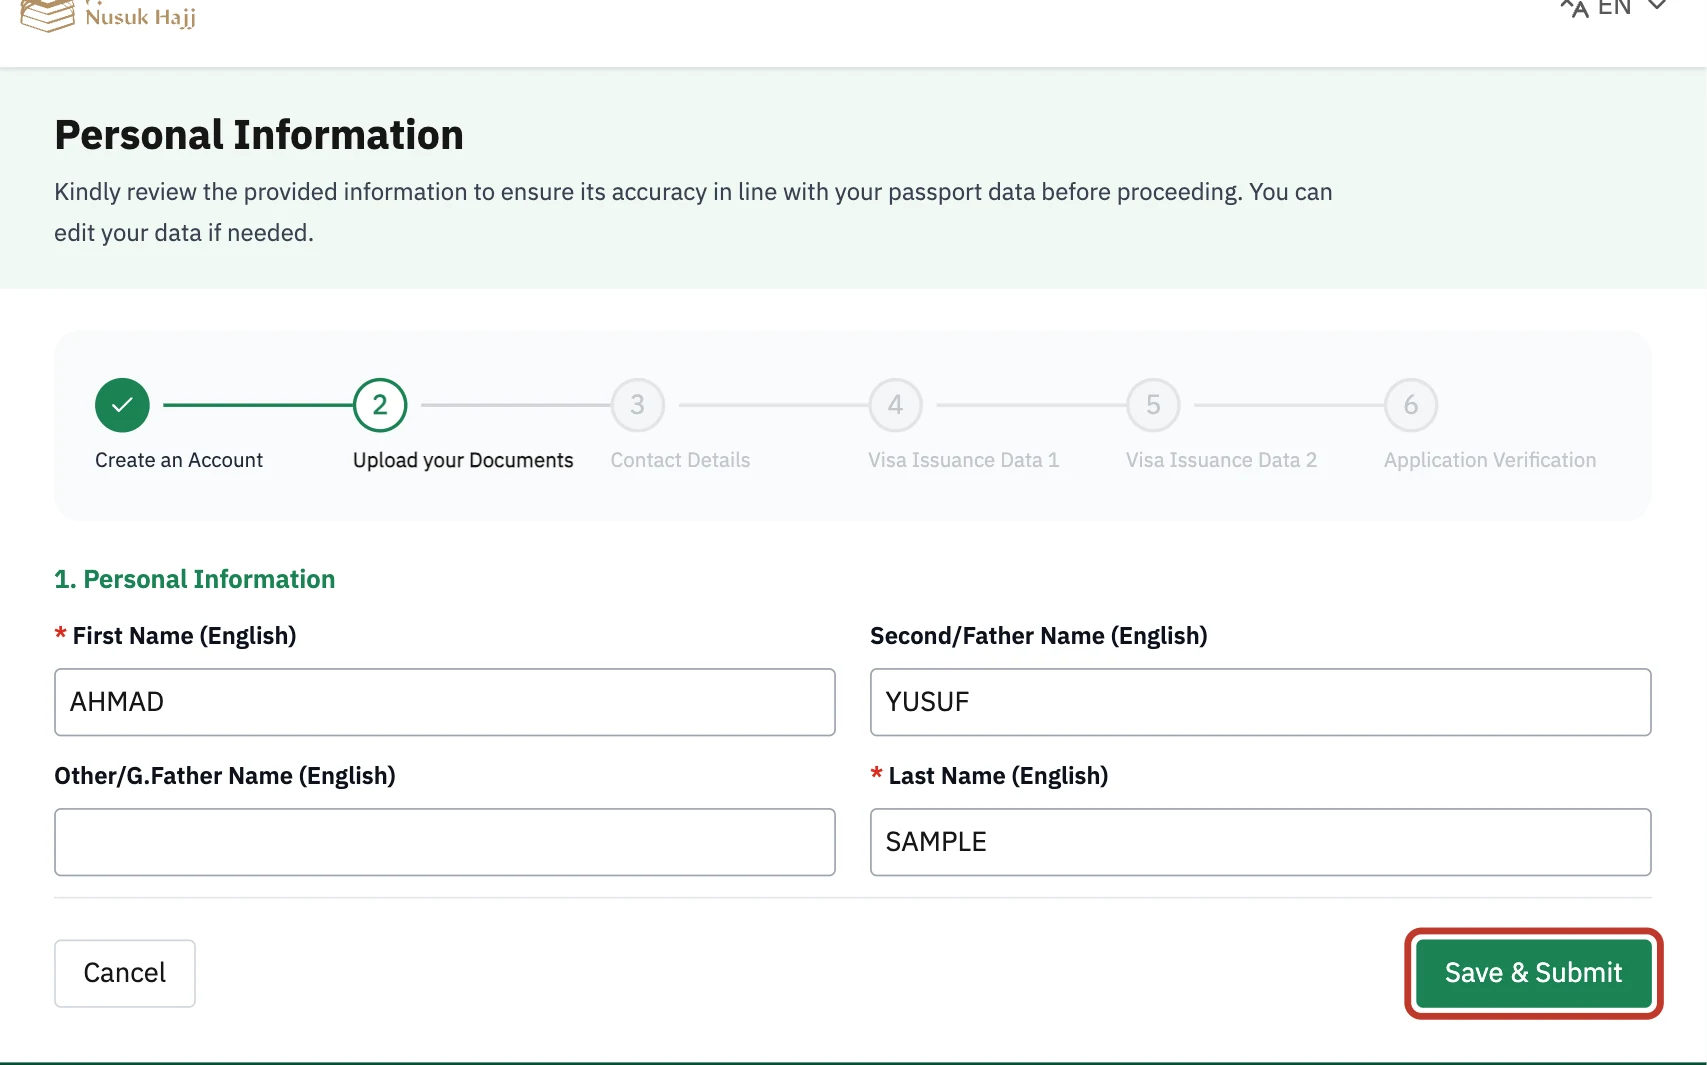
Names are checked by a person, so it is subjective: one reviewer may accept a format, another may not. There are two ways to fill the four boxes. If the preferred way was rejected, use the second one. Where to type them: open at the end of this section.

First, check the passport scan. A blurry or glary passport image also produces a name rejection, because the reviewer cannot read the name to compare it. If the scan is not sharp, replace it as well ().

Two ways to fill the four boxes

Same letters as the passport, different boxes. 15 characters per box; the two middle boxes may stay empty.

1Output 1 · Preferred way

Given names together in First Name; surname in Last Name.

AHMAD YUSUF SAMPLE →First: AHMAD YUSUFLast: SAMPLE
2Output 2 · Second effective way

One word per box: first name, then father’s name, then grandfather’s name; surname in Last Name.

AHMAD YUSUF SAMPLE →First: AHMADSecond/Father: YUSUFLast: SAMPLE

Rejected with the preferred way? Resubmit with the second way, and the other way round. Type the passport name below and both are worked out for you.

Work out your own name

Pick the passport, type the printed lines, read the two outputs. Nothing is saved or sent.

  1. Open the name boxes

    Click your name at the top right → My Family → Click here for more beside the member (or My Profile for yourself) → Edit next to Personal Information → Proceed to Edit.

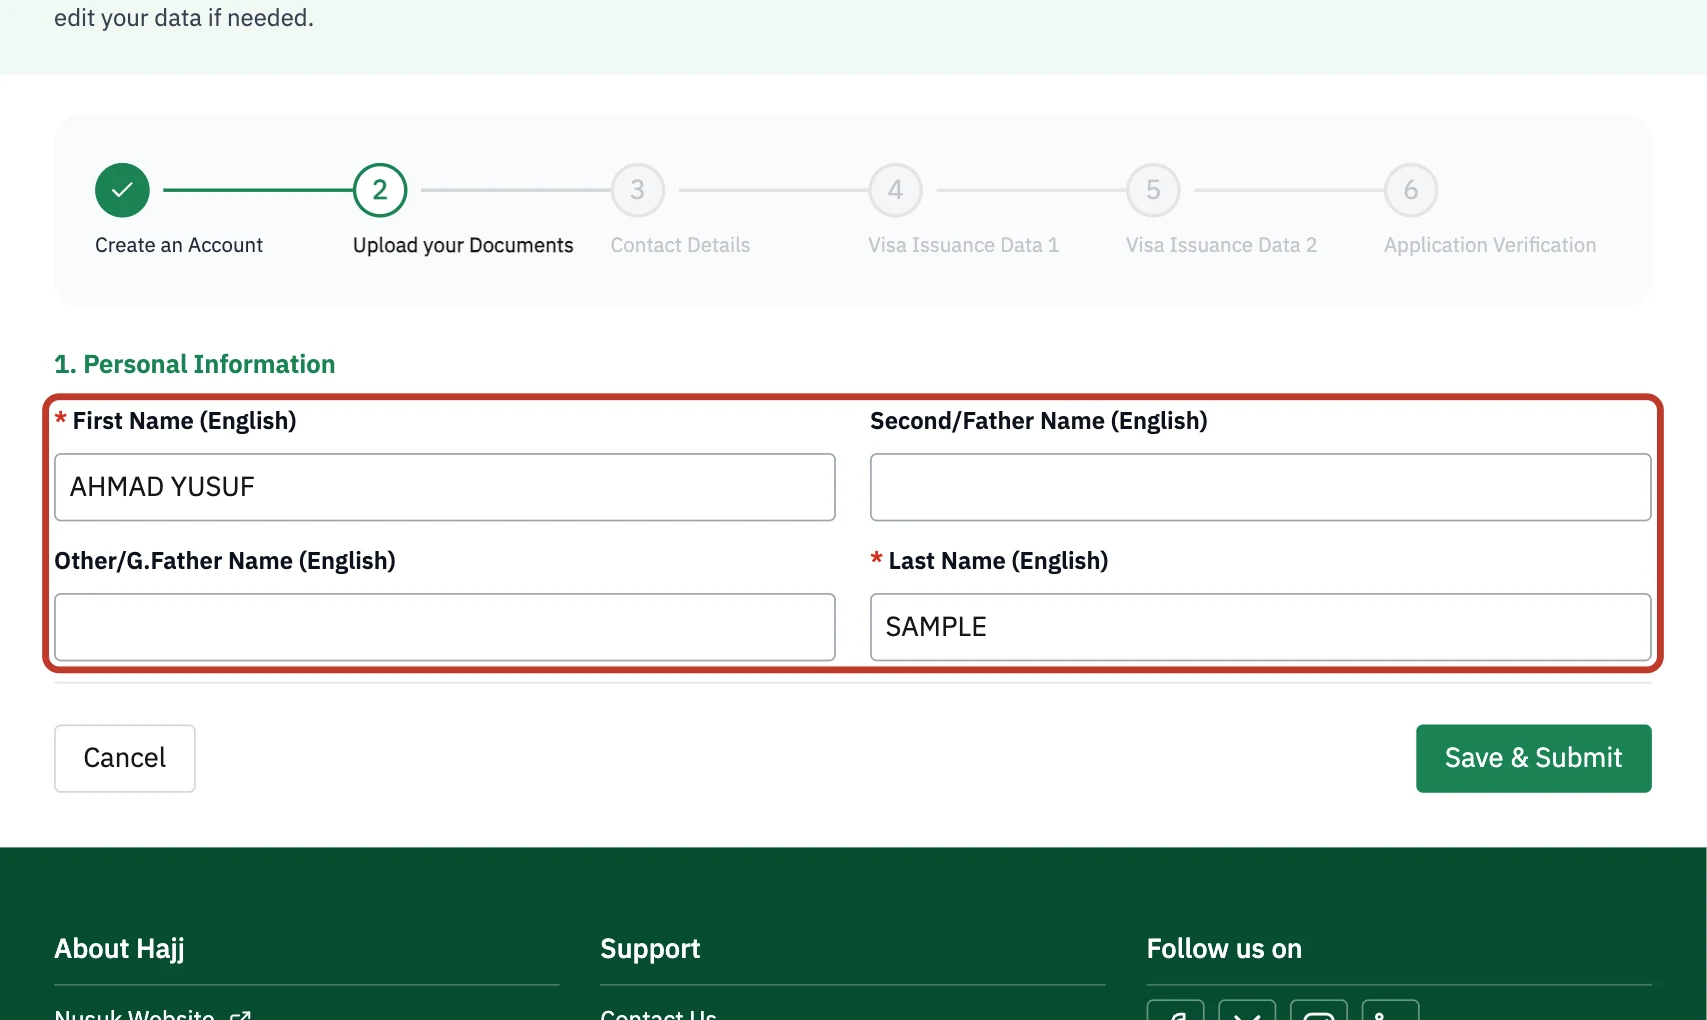
    The four name boxes are at the top of the form: First Name, Second/Father Name, Other/G.Father Name and Last Name (English).

    The four name boxes. Only the admin can type in them.
    Screenshot comingThe four name boxes at the top of Personal Information
    The four name boxes. Only the admin can type in them.
  2. Type the output into the boxes and resubmit

    Replace the contents of the four boxes with the output you are trying. Leave the passport dates and documents alone. Click Save & Submit, then Continue to Submit. The status returns to Under Verification.

    The boxes filled with the output you are trying, then Save & Submit.
    Screenshot comingThe name boxes filled in, Save & Submit below
    The boxes filled with the output you are trying, then Save & Submit.

If the names cannot be edited

  • No Edit button at all? You are not logged in as the admin. Members never see Edit. Log out and log in with the admin’s account.
  • Edit is there, but the boxes are locked or the change is refused? Do not keep retrying. Note the exact message, take a screenshot, and ask Nusuk to correct the names for you, quoting the passport spelling ().
  • Rejected twice with both outputs? Check the passport scan again (Section 2), then contact Nusuk with the exact notice.

Contact Nusuk if All Fails

Call the 24/7 support line; email or a ticket if you cannot call

Nusuk Hajj has a support line in Saudi Arabia, open 24 hours a day, 7 days a week. Calling is the best way to get an answer. Use it when the notice makes no sense, when a fix was rejected again, or when a field cannot be edited. From abroad, the cheapest reliable way to call is an internet calling app.

  1. Download Google Voice

    A free app; a Google account is needed. Both buttons install the same Google Voice app.

    Add $5 of calling credit to make the call

    Inside the app. Calls to Saudi Arabia cost about $0.11 per minute, so a few minutes cost well under that.

  2. Call this number

    Nusuk International landline helpline number+966920031201

    Copy and paste it exactly. Do not add 00. Do not change it. People mistype it and waste days calling the wrong number.

    This is not a WhatsApp number. Please do not use WhatsApp to call this number. Dial it as a normal phone call from Google Voice.
  3. Say who is calling

    “This is [your name] calling, my passport number is [number].” They look up the account and help you understand the issue. That is it.

Cannot call? Two other ways to reach Nusuk

Calling is the best option: the line is open 24/7 and you get an answer on the spot. If you really cannot call, Nusuk also takes written requests:

Email

Write from the admin’s registered email. Give the admin’s full name as registered, the name of the person who was rejected as printed in the passport, and attach a screenshot of the notice.

Support ticket

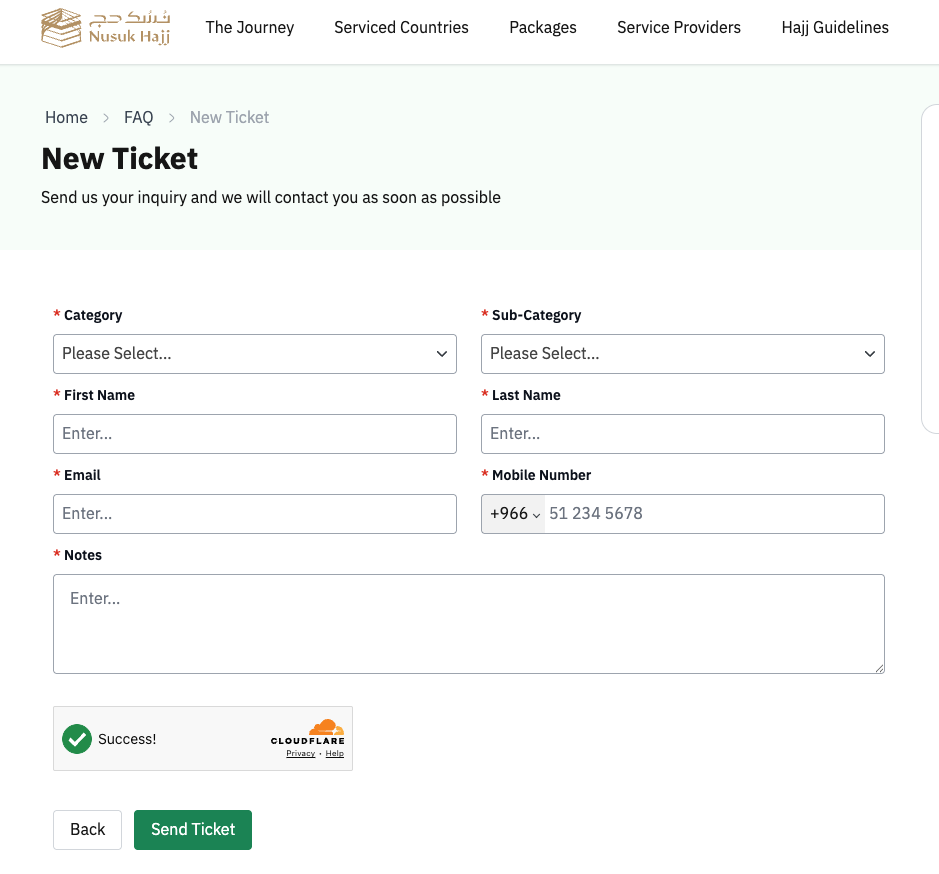
Opens on the real Nusuk site (Home › FAQ › New Ticket). Describe the problem in Notes, quoting the notice word for word, and keep whatever confirmation you get.

The New Ticket form on hajj.nusuk.sa: Category, Sub-Category, First Name, Last Name, Email, Mobile Number, Notes, then Send Ticket
Screenshot comingThe Nusuk support ticket form
The New Ticket form: pick a Category and Sub-Category, fill in the admin’s name, email and mobile number, describe the problem in Notes, pass the Cloudflare check, then Send Ticket.

Also ask in the Mabroor Essentials Reddit forum: someone has usually seen the same notice.

After you resubmit

Now the waiting